
1. First off here's what you will need need:
- A base (duh)
- An epoxy putty (like green stuff) or epoxy clay (I use Milliput because it's cheap and has worked well for this type of project)
- A scrap of window screen (I found a scrap at work, but I'm sure this stuff is dirt cheap)
- Wax paper or a plastic baggy
- Water

2. Mix up some of your putty and stick it on your base, like so


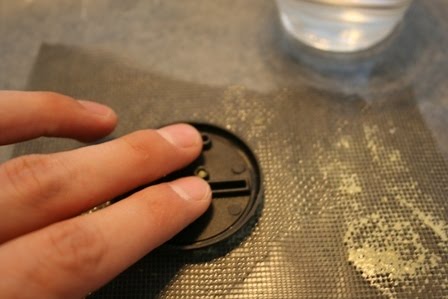
3. Use your fingers to spread the putty over the base (wear gloves if your skin gets irritated by the putty, it also would remove the chance of leaving fingerprints in your base)

4. Wet your fingers with water and rub the base in a circular motion to get the top of the base smooth and even (you could try baby oil, olive oil or any other kind of lubricant if you're using greenstuff)

5. Put some wax paper down over a table or some other hard flat surface, then place the window screen on top of the wax paper and wet it down. You want to use enough water (or oil) to make sure that the putty won't stick to the screen when you're pulling it up. You probably can't see how much I'm using in these pictures, but be very generous with the water.


6. Now the moment of truth. Flip your base upside down and set it on the wet window screen. Then take your fingers and press down on the base. Give it plenty of pressure. Make sure you push down on every part of the base. I usually run my fingers around the rim of the base and then give the center of the base a few good pushes. Also, be careful not to wiggle the base around or lift up pressure as this could result in wonky shaped 'squares' or double stamping.

7. Now gently peel the base up while holding down the screen. And viola! If you are unhappy with the way the pattern came out you can always smooth it out with your fingers again and go for another try. If you see depressions in the putty that weren't stamped with the pattern you can either try to fill them in with more putty and smooth the base out and stamp again, or just leave it. Unless I'm going for a perfect base for a special model I usually leave the depressions as is. When you paint up the base those areas look like they have been worn and smoothed out from foot traffic. I think it adds some nice visual variety.

8. If you are using Milliput you might want to take a paper towel or napkin and clean up the rim of the base. When I do this it makes me feel like I'm plating an entree at a fine restaurant, so that's exciting for me...

9. Once that's done you have your base! Leave it to dry overnight before you begin to paint, I usually wait 24 hours on mine.

10. Now that our base has dried we can start to paint (this is actually a medium sized base that was already dried, not the large base that I just made above). You can prime your base if you choose (I'd recommend it if you are using green stuff) but since milliput dries close to the same color I want my base to be I generally skip priming.

11. Start with a basecoat of Menoth Base (Or bleached bone)

12. Start painting on your pattern. A few things to remember:
- This is definitely a case of measure twice, paint once. Often times I'll draw out my pattern on a piece of grid paper or even paint it onto the base to test it out before putting on the base coat.
- As you are planning your pattern keep in mind that you don't want your entire pattern contained within the base. Let the pattern run off the edge. Don't center it, instead have about 3/4 of a pattern on the base. This is the same thing that artists do when they are planning a scene. If you have your painting (pattern) end right at the frame (base) it seems staged and artificial. If the painting seems like only part of what is happening in that world, that there is action happening outside of the frame, then the painting is much more real and immersive. I have to admit that I don't always follow this rule with my bases, but when I do I think the result is much more visually appealing.
- You'll want your paints a little thicker than normal to avoid runny paints seeping into the cracks. I'd say get your paint about the consistency of cream, rather than what you normally paint with being the thickness of skim milk. (You are thinning your paints enough right?)
-When you're choosing the colors for your pattern go about one shade brighter than what you want the finished product to look like. The Gryphonne Sepia wash we are going to use will bring the brightness of the colors down a notch.
-Use a brush with a nice sharp point, but that can carry enough paint to do multiple squares in a single load. I use my size #2 Windsor + Newton series 7, but then again I use that brush 90% of the time anyway. Get one, you won't regret it.


13. Once your pattern is complete load up your brush (any old brush will do) with Gryphonne Sepia wash and go to town. Really slop this stuff on there, you want to make sure it's pooling in the cracks because that will add the right depth to the base and make sure your pattern pops.


14. Let the base dry completely and then clean up the edge of the base with some black paint.


15. Pin your model's feet to the base, apply glue and you're done. Congratulations!

Really nice tutorial, I like how every base has a unique pattern.
ReplyDeleteGreat tutorial man! It's given me some ideas on how to do bases in the future.
ReplyDeleteGreat Idea! That came out awesome!
ReplyDeleteThat's some cheap steak
ReplyDeleteOh and awesome idea.
Great idea. Well presented.
ReplyDelete